Instead of sharing all of the pictures in one post (because 90% of you have probably already seen them on FB), I thought that I would share more about the planning process and my inspiration for some of the decor over the next few posts.
Hope you enjoy!
The first step was deciding on a 'theme' for the party. I went back and forth between Carnival Themes, Zoo Animals, Owls, etc. etc. but what I really am best at, or rather is the most simple, is using color. I tend to prefer bright colors over pastels and while Logan is "Girly" she is not "Princess-y" if that makes any sense.
After scouring the Internet for invitations, my favorites ended up being from Shutterfly. I loved the colors of it which solidified Pinks and Orange for my party color palette. I tweaked the wording in the invitation a bit as well after I saw several First Birthday invitations with the 'Big One' as the title. This helped me make the party unique to a First Birthday rather than any other year.
See Final Invite:
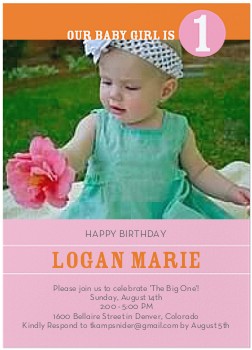
Finally One Pink Birthday Invitation
Shop birthday cards and invitations at Shutterfly.com.
View the entire collection of cards.
The first project I took on was inspired from this July Anthropologie window display:

Amazing, right?
After pleading with the store manager to have several of these strings when they took them down and even offering to come after hours and cut down myself (I have no shame when it comes to this stuff - she still said no), I decided to make some myself, hmpf. The basic idea is threading several circles with a sewing needle and tying knots between each circle to provide space. Easy enough I thought.
Well, about an hour into the whole process at Tiffany's Sweat Shop, I had about 4 strings of circles. Not quite the density I had planned for the corner of our dining room where her high chair would go. I still liked the way they looked, however and did about 6 more. I taped all of the individual strings together on the guest bed and laid them flat.
A certain someone, ahem Logan, decided one day that these would be the perfect thing to play with and play she did. She grabbed them off the bed, twisted the stings into so many knots and loops (think jewelry after not properly packing it for vacation) that I knew it was a lost cause. I was bummed that I wasn't going to be able to use them but fortunately did not throw them away.
Although, this is not how I had originally intended them to look, I have to say I loved the way the way these knotted circles turned out after I messed with them on our mirror. It gave some texture to the room and was a statement as you walked in...so, thanks Logan!

Again, all you need for this is thread, a needle, cut out circles in various sizes from colored card stock and your two hands that can make several knots. The size, color and quantity of circles can vary from string to string depending on your preference. Either hang individually or knot up like these for a collage feel.
More to come...
No comments:
Post a Comment